
It’s collaboration week with Chibitronics and Winnie & Walter!
We are planning to giveaway so please look forward to it.

I'm also part of a blog hop with giveaways!
To celebrate the hop we have prizes for two lucky random commenters! Winnie & Walter is giving away a $30 gift certificate and Chibitronics is giving away a $30 starter kit so leave a comment on each hop stop for the most chances to win!! Leave your comments before 11:59 PM CST on May 29th and the winners will be announced shortly after!
The related blog posts are at the bottom of this post.
Today I make light up Pop-up card.

I'm using these stamps and dies.
"Party On with Evelin T Designs"
"Party On with Evelin T Designs Cutaways"

"Essentials Audrey Cutaways"

"Stampendous Pop Up Stages Die Set"

What you need to make a light up card is like this.
"Red, Yellow, Blue Megapack"
"Pink, Orange, Green Megapack"
"Copper Tape"
"3V coin cell battery" (CR2016)

I'm using these papers and acetate sheet.
"White vellum paper"
"80lb White cardstock"

I will make the parts referring to the picture below.

- 5.25 x 8.25 inch white cardstock
- Two guava cardstock (5.5 x 4.25 inch)

- Die cut white cardstock using the large frame die.
- Three vellum paper
- Three switch parts (0.5 x 0.5 inch)
- Acetate pull tab part (0.5 x 2.5 inch)
- Stamp three animals onto white cardstock.
Color the animals with Copic markers and die cut using the coordinating die.
(E71, E74, YR24, YR27, E31, E33, E39, E40, C2, C5, R37, Y11)

Stamp notes onto vellum using StazOn Jet Black Ink.

Die cut white cardstock using the pop-up
and note dies.

Put two guava cardstock 2 mm apart
with washi tape.

Make the switch mechanism.
Draw a line 1/2 inch from the edge of the
card. Draw three lines at 1/4 inch intervals. Mark 1/4 inch from the center of the card.

Make a crease 1/2 inch from the edge of the acetate pull tab part.
(If the strength of the pull tab is insufficient, stick two pieces together.)
Make the slit.

- Put the line drawn on the left card and the crease of the pull tab (blue arrow), and mark the tip of the pull tab. (green arrow)
- Fold the card to 90 degrees, align the pull tab part with the mark on the right card (blue arrow), and mark the tip of the pull tab. (yellow arrow)
- Mark 1/2 inch right from the line you just drew. (white arrow)
- Cut the space between the three marks with a craft knife to make a 1 mm wide slit.
Put the insert on guava card base and
mark the notes with a pencil.

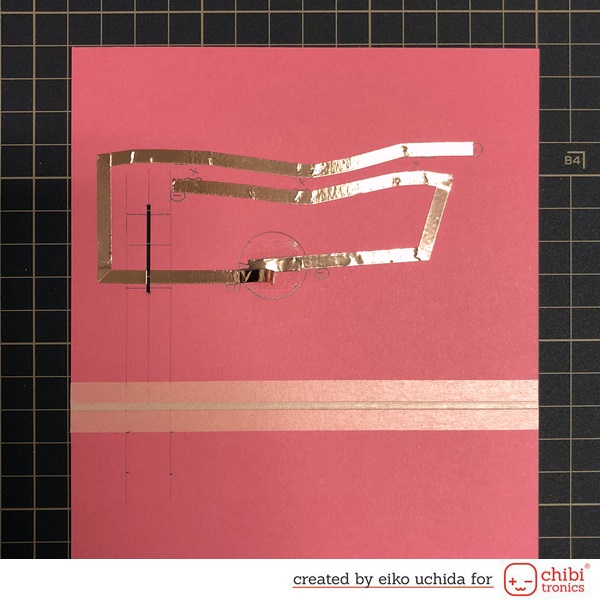
Make the circuit.
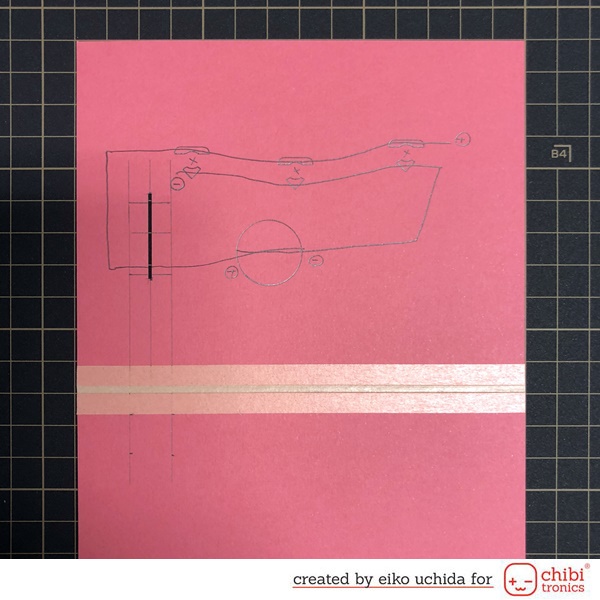
- Mark the position of the Chibitronics and the battery.
- Draw the circuit with a pencil.
- Make sure the positive side circuit crosses the bottom edge of the slit.
- Put the double-sided tape on the position of the battery.
- Adhere the copper tape on the drawing path.
- At the position of the battery, peel off the release paper, adhere the negative side copper tape, turn it back and cut it.
- At the position of the battery leave about 1 inch of positive side copper tape and cut it.

- Place the battery on the copper tape with the positive side up and adhere the positive side copper tape on the battery.
- Adhere the yellow, red and orange Chibitronics on the mark.
Adhere copper tape on the Chibitronics to
reinforce.

Make the switch part.

- Fold square parts in half and insert the switch part into the slit.
- Place the switch part on the bottom end of the slit and adhere the copper tape.
- Pull the switch part out of the slit and adhere copper tape around it.
- Insert the switch part into the slit and confirm that the LED turns on.
Apply double-sided tape on 1/2 inch square
parts and put it on the switch part on the cover side.

Put the double-sided tape on the switch
part and acetate part.

Place the switch part at the top end of the
slit, peel off the release paper of double-sided tape and close the card base.

Looking from the side, it is like this.

The switch mechanism is completed.
Make the insert.

- Draw the line 1/4 inch from the center of the card and cut it.
- Adhere vellum paper on the back of the insert panel.
- Fold the insert along the crease.
- Stamp the notes onto the insert.

- Put the foam tape on the upper half of the back side of the insert.
- Do not put the foam tape to the position of the acetate part.
- Put the double-sided tape on the lower half of the back side of the insert.
Adhere the insert on the guava card
base.

Looking from the side, it is like this.

Adhere the animal parts on the pop-up
parts.

Make the cover panel.

- Place the animal part on the cover panel and stamp the sentiment and notes.
- Adhere the animal part on the cover panel with foam tape.
- Put the double-sided tape on the back of the cover panel.
- Adhere the cover panel on the guava card base.
I finished it!
When you open the card, the Chibitronics
glow.
Be sure to check out the whole video tutorial for more details.
Thank you for stopping by!
The next blog hop is the blog of Kelly Szafron.
And full hop are below.


What a clever card! Those critters are adorable. Great photos of your process also!
返信削除Eiko, your cards and tutorial are amazing every time! Thank you for your generous mind!
返信削除So cute with these critters and the light up music notes.
返信削除What a fabulous and fun music card. Thanks for the video.
返信削除Such a fun idea - I'm so impressed with putting this together!
返信削除Oh my goodness !!! This is so clever and awesome !! That’s not a card but a mastercard !! 😄
返信削除[margessw(at)icloud(dot)com]
Wowsers Eiko! Amazing cards and fantastic tutorial! Thanks you for sharing!
返信削除Clever, I haven't seen them switched on in that way before :)
返信削除Wow! How awesome is all of this? I love all these tiny lights and the animals playing the instruments are super cute! Thanks for a really AMAZING picture tutorial! You made it look easy!
返信削除Oh my goodness, what an adorable and fun card!
返信削除What a cute card.
返信削除Thanks for sharing...
This is fantastic! Thank you so much for taking the time to do the detailed step by step photos and instructions!
返信削除Oh my! Your cards are so cute!!! Thanks for this great step by step tutorial!
返信削除I love all of the new ideas!
返信削除So very sweet!
返信削除wow thanks for the details on how you made this awesome card!!!
返信削除These are awesome cards! :)
返信削除Adorable cards! Thanks for the chance to win and sharing.
返信削除Wow..Such a cute and fun card..Thank you so much for sharing the tutorial..
返信削除These cards are adorable! Thanks for sharing how to make them :)
返信削除I love blog hops because they inspire me to create--thank you!!!
返信削除Wow!! The construction of your card is amazing! I would never have thought to put lights behind musical notes. It works so well. Thanks for sharing!!
返信削除Such beautiful details to bring the music lights! The card is gorgeously done!
返信削除So cute! Thanks for sharing the process!
返信削除Thanks for sharing your sweet interactive card and a step-by-step tutorial.
返信削除This is so clever! I love the inside!
返信削除Love the surprise element inside the card. Thanks for sharing the detailed steps to recreate this project.
返信削除Oh wow a pop-up and a chibitronic card. Amazing!
返信削除Thank you for all your wonderful tutorials. This is fabulous. I wish I was talented and patient like u. You can get more patterns If you are interested in pop-up cards. View more designs from them:summer 3d pop up card, 3d pop up paper flower bouquet
返信削除